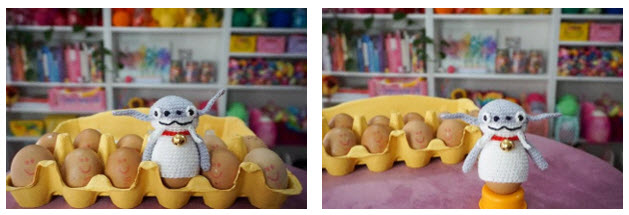
To celebrate Easter this weekend, Final Fantasy XIV Online has partnered with an Aussie mum to create video game inspired egg cosies.
Natalie Schwarz from Little Cosy Things created five crochet egg cosies based on iconic characters from the game, with accompanying guides so anyone can make them too.
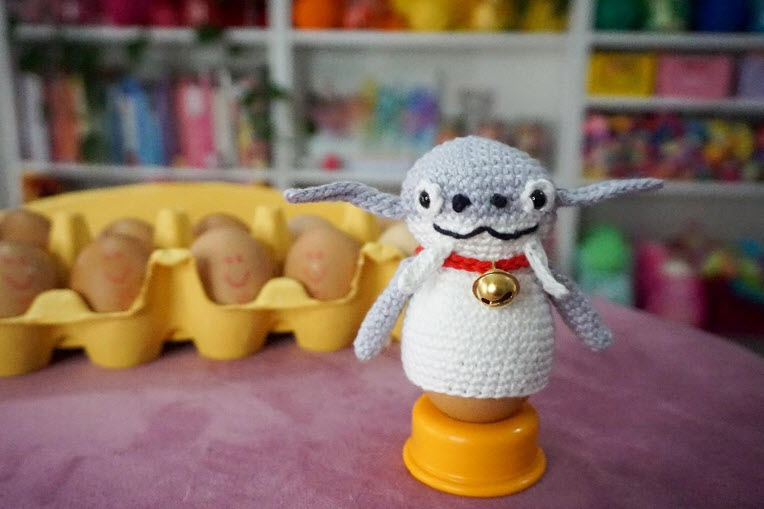
The guides feature the loveable creatures from FFXIV, including the Moogle, Namazu (Namazu Guide shown below), Spriggan, Korpokkur Kid and Great Serpent of Ronka.
The guides include step by step instructions on how to create each cosy, so that anyone can have a go at creating them.
Namazu – Egg Cosy Crochet Pattern
Materials required
All materials available via www.littlecosythings.com.au
- 3mm crochet hook
- darning needle
- scissors
- stitch Marker
- 1 hard boiled egg
- yarn
DK/8ply cotton by Paintbox Yarns, from LoveCrafts, for the Egg Cosy in the following colours:- grey (main colour)
- white (main colour)
- red (necktie)
- black (eyes)
Crochet Terms
US terms
- ch – chain
- st – stitch
- sl st – slip stitch
- sc – single crochet
- hdc – half double crochet
- dc – double crochet
- tc – triple crochet
- inc – (increase) 2 stitches in the same stitch
- dec – (decrease) sc 2 stitches together
Pattern Notes
We will be working in continuous rounds for all parts of this pattern (except the leaf). Use a stitch marker on the last stitch of every round, moving it up as you go, so you can mark your place.
When following the patterns below, the number in brackets at the end of every round is the stitch count for that round. Use this to make sure you have done the correct amount of stitches for that round.
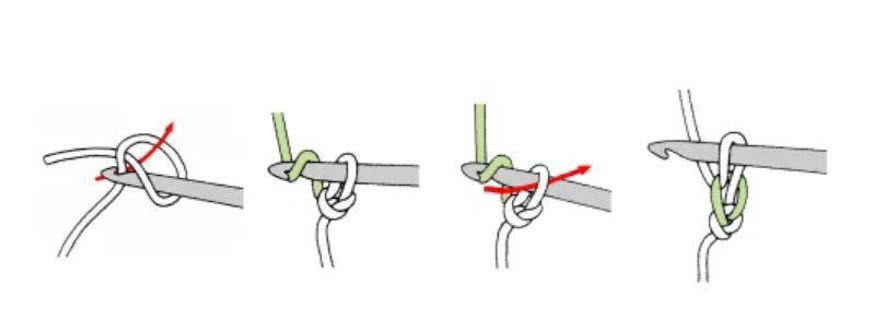
Chain (ch)
Begin with a slip knot on your hook; you will have one loop on your hook (however, this first loop does not count as a chain). Yarn over and draw the yarn through the loop – you have made one chain. Repeat for however many chain stitches the pattern requires.
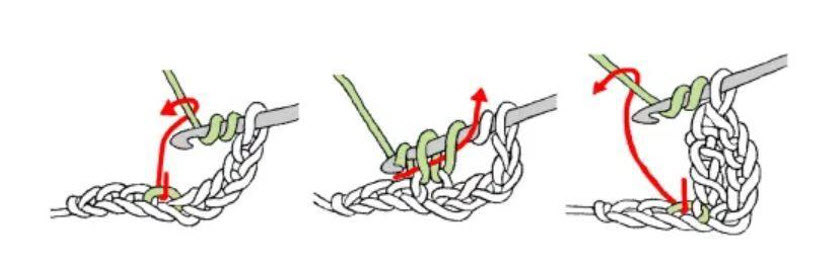
Slip Stitch (sl st)
A slip stitch can be used for joining, shaping or for skipping stitches. To make a slip stitch, without yarning over, insert hook into the next stitch. Yarn over, & pull the yarn through both loops on the hook.
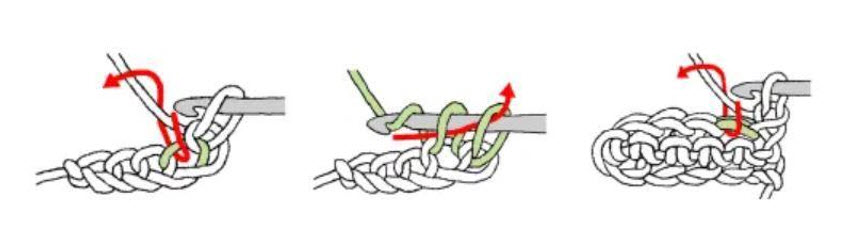
Single Crochet (SC)
Insert hook into next stitch, yarn over and draw up a loop (2 loops on the hook), yarn over and pull through 2 loops on the hook.
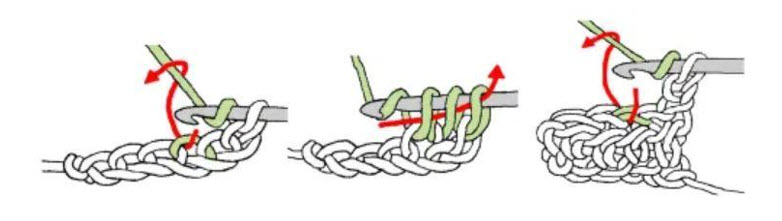
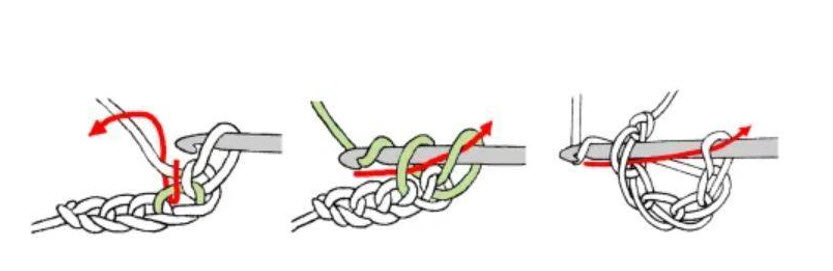
Half Double Crochet (hdc)
Yarn over and insert hook into the next stitch. Yarn over and pull up a loop (3 loops on hook); yarn over and pull yarn through all 3 loops on the hook.
Double Crochet (dc)
Yarn over and insert hook into the next stitch. Yarn over and pull up a loop (3 loops on hook); yarn over and pull through 2 loops, yarn over and pull through 2 loops once more.
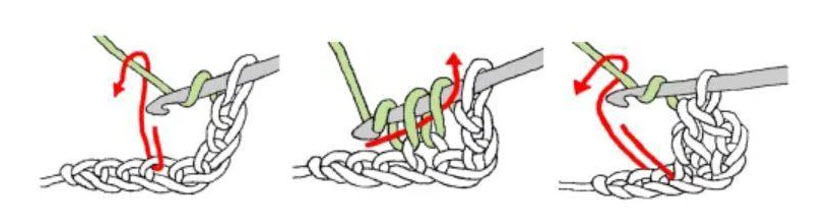
Triple Crochet (tc)
Yarn over and insert hook into the next stitch. Yarn over, twice, and pull up a loop (4 loops on hook); yarn over and pull yarn through 2 loops, 3 times.
Pattern
Body
Using white yarn:
Round 1: Make a magic ring, or chain 4 and slip stitch to the first chain to form a ring. 6 single crochet into the ring (6)
Round 2: Increase in each stitch (12)
Round 3: (1 single crochet, increase) repeat (18)
Round 4: (2 single crochets, increase) repeat (24)
Round 5: (3 single crochets, increase) repeat (30)
Round 6: 1 single crochet in each stitch (30)
Round 7: (4 single crochets, increase) repeat (36)
Round 8: 1 single crochet in each stitch (36)
Round 9: (5 single crochets, increase) repeat (42)
Round 10-13: 1 single crochet in each stitch (42)
Round 14: (5 single crochets, decrease) repeat (36)
Round 15-16: 1 single crochet in each stitch (36)
As each egg will be slightly different in size, you may need to skip round 17 if the egg cosy is too tight for your egg, or if you are using a large egg cup.
Round 17: (4 single crochets, decrease) repeat (30)
Fasten off, weave in tail.
Arms (make 2)
Using grey yarn:
Round 1: Make a magic ring, or chain 4 and slip stitch to the first chain to form a ring. 6 single crochet into the ring (6)
Round 2-3: 1 single crochet in each stitch (6)
Round 4: (1 single crochet, increase) repeat (9)
Round 5-8: 1 single crochet in each stitch (9)
Round 9: (2 single crochet, increase) repeat (12)
Round 10-11: 1 single crochet in each stitch (12)
Fasten off, leaving a long tail.
Mandibular Barbel (make 2)
Using white yarn:
Row 1: Chain 6 stitches. 1 single crochet in the second stitch from the hook. 1 single crochet in the next 3 stitches. Fasten off, leaving a long tail
Maxillary Barbel (make 2)
Using grey yarn:
Row 1: Chain 11 stitches. 1 single crochet in the second stitch from the hook. 1 single crochet in the next 9 stitches.
Fasten off, leaving a long tail.
Head
Using grey yarn:
Round 1: Make a magic ring, or chain 4 and slip stitch to the first chain to form a ring. 6 single crochet into the ring (6)
Round 2: Increase in each stitch (12)
Round 3: (1 single crochet, increase) repeat (18)
Round 4: (2 single crochets, increase) repeat (24)
Round 5: (3 single crochets, increase) repeat (30)
Round 6: (4 single crochets, increase) repeat (36)
Round 7: (5 single crochets, increase) repeat (42)
Round 8-10: 1 single crochet in each stitch (42) change to white yarn
Round 11: (5 single crochets, decrease) repeat (36)
Fasten off, leaving a long tail.
Bell necktie
Leave making the necktie until you have sewed the head to the body
Using Red Yarn:
Row 1: Leave a long tail for sewing, and chain 27 stitches.
Measure your necktie around Namazu’s neck, you may need to add or remove chains, depending on how much stuffing you used on his head. Once happy with the size fasten off, leaving another long tail.
Eyeball (make 2)
Using White Yarn:
Round 1: Make a magic ring, or chain 4 and slip stitch to the first chain to form a ring. 6 single crochet into the ring (6) Fasten off, weave in all tails.
Assembly
Begin by attaching the safety eyes first to the white eyeballs, and then to the head. Insert a safety eye directly into the centre of each eyeball. Then take the eye and insert into the head between rounds 9-10, at approximately 8 stitches apart. Make sure you have them in the correct position, before attaching the washes at the back of the safety eyes, as they cannot be removed once fixed in place.
Next make 2 French Knots with black yarn for the nostrils, in between the eyes (1 stitch away from each eye, with a space of 2 stitches between each nostril). To make a French Knot for the eyes; insert the darning needle inside the head, and pull out through a stitch to the outside, where you would like the nostril to be. Wrap the yarn around the needle, 4 times and keep it taught, while pushing the needle back down through the closest stitch. Pull through tight on the other side. A little knot should have formed for the nostril.
Once the nostrils are in place, use the same black yarn to sew the mouth.
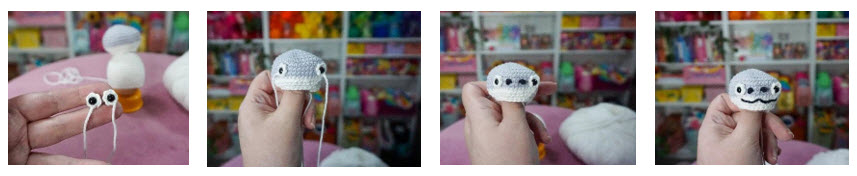
Sew the maxillary barbels to the side of the head, one to the left of one eye, and one to the right, approx. 2 stitches from the eyeball. The barbels are sewn on rounds 11 and 12. Stuff the head firmly, and using the tail, sew the head onto the top of the body.
Once the head is sewn on, you can now sew the mandibular barbels to the bottom of the head, approximately 1 row below the mouth. Attach the arms to either side of the body, one row below where the head is attached.
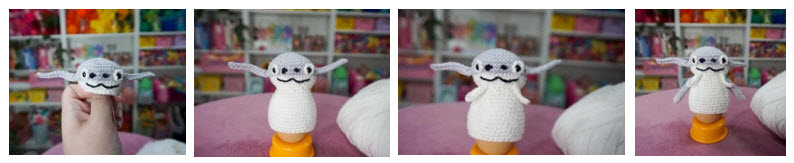
Lastly, make the bell necktie, and thread a bell through onto the middle of the chain. Using the 2 long tails, tie the bell necktie around Namazu’s neck.
Now, carefully slip your finished Namazu Egg Cosy over your egg, and you are finished!